The meter element is designed to demonstrate the scalar measurement within a known range or a fractional value. This is also known as gauge.
Typical examples would normally be like: Hard-disk usage, CPU memory usage, battery life, fuel gauge, etc..
HTML <meter> Tag
| HTML element: | <meter> |
<meter value="59" min="0" max="100" low="20" high="80" optimum ="100" ></meter>
Attributes:
| Attribute | Description | Value type | Default value | Mandatory |
|---|---|---|---|---|
value | define the current value of the gauge | number | – | yes |
min | define the minimum value of the range | number | 0 | no |
max | define the maximum value of the range | number | 1 | no |
low | define the boundary value for low value in the range | number | – | no |
high | define the boundary value for high value in the range | number | – | no |
optimum | define the optimum value in the range | number | – | no |
form | link to form id where <meter> belongs to | form id | – | no |
Example 1: Simple version (without high & low boundaries and optimum value)
Sample HTML:
Battery Life: <meter value="59" min="0" max="100"></meter>
Result:

Example 2: Specify high & low boundaries and optimum value
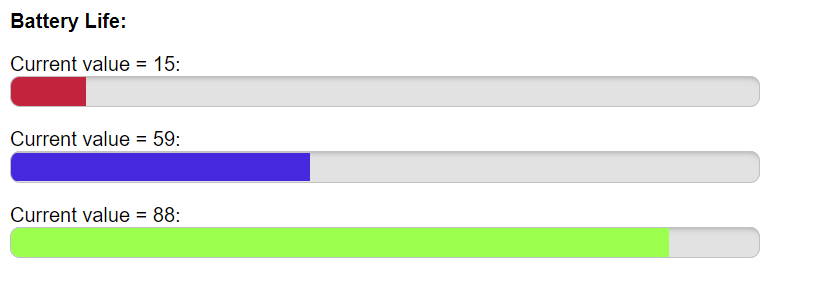
If the low, high, and optimum values are presented, the browser will color the meter’s bar differently depending on the current value falls in which range.
Sample HTML:
<strong>Battery Life:</strong>
<p>Current value = 15: <meter value="15" min="0" max="100" low="20" high="80" optimum ="100" ></meter></p>
<p>Current value = 59: <meter value="59" min="0" max="100" low="20" high="80" optimum ="100" ></meter></p>
<p>Current value = 88: <meter value="88" min="0" max="100" low="20" high="80" optimum ="100" ></meter></p>
Result:

How to style <meter> from CSS
The default appearance of the HTML meter bar differs from browser to browser. But if you need to have a standardized appearance across different browsers, you can use CSS styling to define based on your desired appearance.
For example:
/*for meter track*/
meter,
meter::-webkit-meter-bar {
    /*to remove the default background property */
    background: none;
    width: 300px;
    height: 25px;
    border-radius: 8px;
    overflow: hidden;
    background-color: rgb(226, 226, 226);
    box-shadow: 0 5px 5px -5px rgba(0,0,0,0.3) inset;
}

/*for meter bar*/
meter::-webkit-meter-optimum-value {
    background: none;
    background-color: rgb(154, 255, 77);
}
:-moz-meter-optimum::-moz-meter-bar {
    background: none;
    background-color: rgb(154, 255, 77);
}


meter::-webkit-meter-suboptimum-value{
    background: none;
    background-color: rgb(70, 40, 222);
}
:-moz-meter-sub-optimum::-moz-meter-bar{
    background: none;
    background-color: rgb(70, 40, 222);
}


meter::-webkit-meter-even-less-good-value{
    background: none;
    background-color: rgb(194, 36, 62);
}
:-moz-meter-sub-sub-optimum::-moz-meter-bar{
    background: none;
    background-color: rgb(194, 36, 62);
}
Result:

Browser compatibility
| Desktop | Mobile |
|---|---|
source: https://developer.mozilla.org/en-US/docs/Web/HTML/Element/meter#browser_compatibility
Note
One important note is that people should not mix up the usage of <meter> and <progress>. By just looking at the appearances, they may seem identical (with just a bar with a track). But one should note that <meter> should mainly be used to display gauge, while <progress> should only be used to display progress. To know more details about how to create a progress bar, you may refer to the post below.


Leave a comment